Add a Stunning Before and After Slider to Your Wix Site
- Baslon Digital

- Jan 9
- 13 min read
A before and after slider is one of those killer interactive tools that lets you show off two images side-by-side. Your visitors just drag a handle, and voilà—the transformation is revealed. It's hands down the most effective way to visually prove the value of your work with a clear, tangible result.
Why a Before and After Slider Will Be Your New Favourite Thing
In a world where everyone's scrolling at lightning speed, telling people about your results just doesn't cut it anymore. You have to show them. A before and after slider isn't just a clever design trick; it’s a storytelling powerhouse that builds instant trust and gets people clicking. It immediately answers the one question every potential client has: "What can you actually do for me?"

The magic is in the instant visual proof. The human brain famously processes images 60,000 times faster than text, and this interactive comparison makes your value crystal clear. Instead of wading through a long description, your visitor gets to participate in revealing the change, making the whole experience stickier and way more persuasive.
Build Trust and Put Your Value on Full Display
If you run a service-based business, showing off your results is everything. A slider gives you undeniable evidence of your skills, turning vague claims into solid proof. This is absolutely critical for building credibility and helping clients see themselves in the "after" picture.
Think about it in these real-world scenarios:
An interior decorator unveiling a stunning room makeover.
A web designer showcasing a complete website redesign.
A personal trainer highlighting a client's fitness transformation.
A photo editor displaying a retouched image next to the raw original.
In every case, the slider is doing the heavy lifting for you. It’s one thing to say you refreshed a garden, but it’s another to let people slide between the overgrown "before" and the pristine "after." To get a feel for how powerful this is, you can see transformations possible with the Dreamzar App and imagine that impact on your own site.
By letting users control the reveal, you create a little moment of discovery. That small interaction makes them more invested in the outcome and far more likely to remember just how good your work is.
Ultimately, adding a before and after slider isn't just a design choice—it's a smart business move. It grabs attention, builds trust, and provides the visual knockout punch you need to turn a casual browser into a paying client.
The Easiest Method: Using the Wix App Market
If you want to add a slick before and after slider to your Wix site without touching a single line of code, the Wix App Market is your best friend. Honestly, it's designed for speed and simplicity, which makes it perfect for business owners and designers who just need a professional result, fast. The market is packed with third-party apps that plug straight into your site, usually with just a couple of clicks.
This approach completely sidesteps any technical headaches. Instead of trying to build something from scratch, you're picking a ready-made tool designed specifically for showing off transformations. These apps do all the heavy lifting behind the scenes, leaving you to focus on what actually matters—your amazing before and after photos.
Finding and Installing the Right App
First things first, let's jump into the App Market. From your Wix Editor, just look for the "Add Apps" icon on the left-hand menu. A quick search for "before and after slider" or "image comparison" will pull up a bunch of specialised options.
My advice? Look for apps with high user ratings and recent updates. That's usually a good sign that they're well-maintained and won't cause you any trouble. Popular choices like "Before & After Slider" and similar apps offer really intuitive drag-and-drop functionality, making the whole process ridiculously straightforward.
Here’s a glimpse of the Wix App Market, where your search begins.
See how they all have ratings and a quick description? It really helps you make a smart choice right from the get-go.
Once you’ve found one you like, just click "Add to Site." Wix handles the installation automatically, and you can then drag the new slider element onto any page you want. For a deeper dive into what's possible, our overview of the Wix App Market for small businesses can give you more ideas for other valuable tools.
Fine-Tuning Your Slider Settings
With the app placed on your page, now for the fun part: customisation. This is where you bring your visual story to life, and the process is typically dead simple.
Pick Your Images: Just double-click the app to open its settings. You’ll see clear options to upload your "before" and "after" images, pulling them straight from your Wix Media Library.
Style the Slider Handle: Most apps will let you change the handle’s colour, thickness, and even the icon to match your brand's vibe. It’s a small detail, but it makes the slider feel like it truly belongs on your site.
Choose the Orientation: You can usually set the slider to move horizontally (left to right) or vertically (top to bottom). This gives you a bit of creative freedom depending on what best suits your images.
Pro Tip: For a truly professional and seamless transition, always make sure your before and after images have the exact same dimensions. If the sizes are mismatched, the images can jump or resize as someone drags the handle, which totally ruins the effect.
By using an app, you can have a fully functional and beautifully designed before and after slider up and running on your site in just a few minutes. It’s that easy.
Build a Custom Slider with Velo by Wix
So, you've checked out the Wix App Market, and nothing quite hits the mark. When the pre-built apps feel a bit too restrictive and you're craving total creative freedom, it’s time to roll up your sleeves with Velo by Wix.
Velo is Wix’s full-stack development platform, which is a fancy way of saying it lets you inject custom code (specifically, JavaScript) into your site. Don't let the word "development" scare you off. Building a slick before-and-after slider from scratch is surprisingly manageable, even if you’re new to the coding game.
Going the Velo route means you're in complete command. Every pixel, every animation, every interaction can be tailored to match your brand perfectly. You're not just dropping in a widget; you're crafting a unique asset for your website.
Getting Your Page Elements Ready
Before we touch a single line of code, we need to set up the stage in the Wix Editor. The concept here is pretty simple: we'll have two images stacked neatly inside a container. Our code will then cleverly "clip" the top image, revealing the one underneath as the user drags a slider control.
Here’s what you need to grab from the "Add Elements" panel and place on your page:
A Container Box: This is the frame that will hold everything together. In the Properties & Events panel, give it the ID .
The Bottom Image: Pop this inside the container. This will be your "after" shot. Set its ID to .
The Top Image: Place this directly over the bottom one. Make sure they line up perfectly! This is your "before" image. Its ID should be .
A Slider Element: This is the handle your visitors will actually drag back and forth. Position it wherever makes sense (usually just below the images) and name its ID .
Getting the IDs right is crucial. The code is going to be looking for these specific names, so double-check them in the Properties & Events panel. To even see this panel and the code editor, you'll first need to switch on Velo by clicking "Dev Mode" in the top bar of your editor.
The Velo Code Snippet
With your elements in place and named correctly, it's time for the fun part. Open up the code panel at the bottom of the editor and paste the following JavaScript into the Page tab. I’ve added comments to the code to walk you through what each line is doing.
$w.onReady(function () { // This function runs when the page is ready to be displayed.
// Set an initial clip for the 'before' image to be fully visible.
// The clip is defined by four values: top, right, bottom, left.
$w("#beforeImage").setClip({ "top": 0, "right": 0, "bottom": 0, "left": 0 });

// This function triggers whenever the slider's value changes.
$w("#imageSlider").onChange((event) => {
    // Get the current value from the slider.
    let sliderValue = event.target.value;

    // Get the total width of the container holding the images.
    let containerWidth = $w("#sliderContainer").width;

    // Calculate the new clipping point based on the slider's position.
    // This effectively 'cuts' the top image to reveal the bottom one.
    let newClip = (sliderValue / 100) * containerWidth;

    // Apply the new clip to the 'before' image.
    // We are only changing the 'left' clip value to create the horizontal reveal.
    $w("#beforeImage").setClip({ "top": 0, "right": 0, "bottom": 0, "left": newClip });
});
});
The diagram below shows the much simpler, no-code process you'd follow using an app from the market—which we've just bypassed with this custom build.
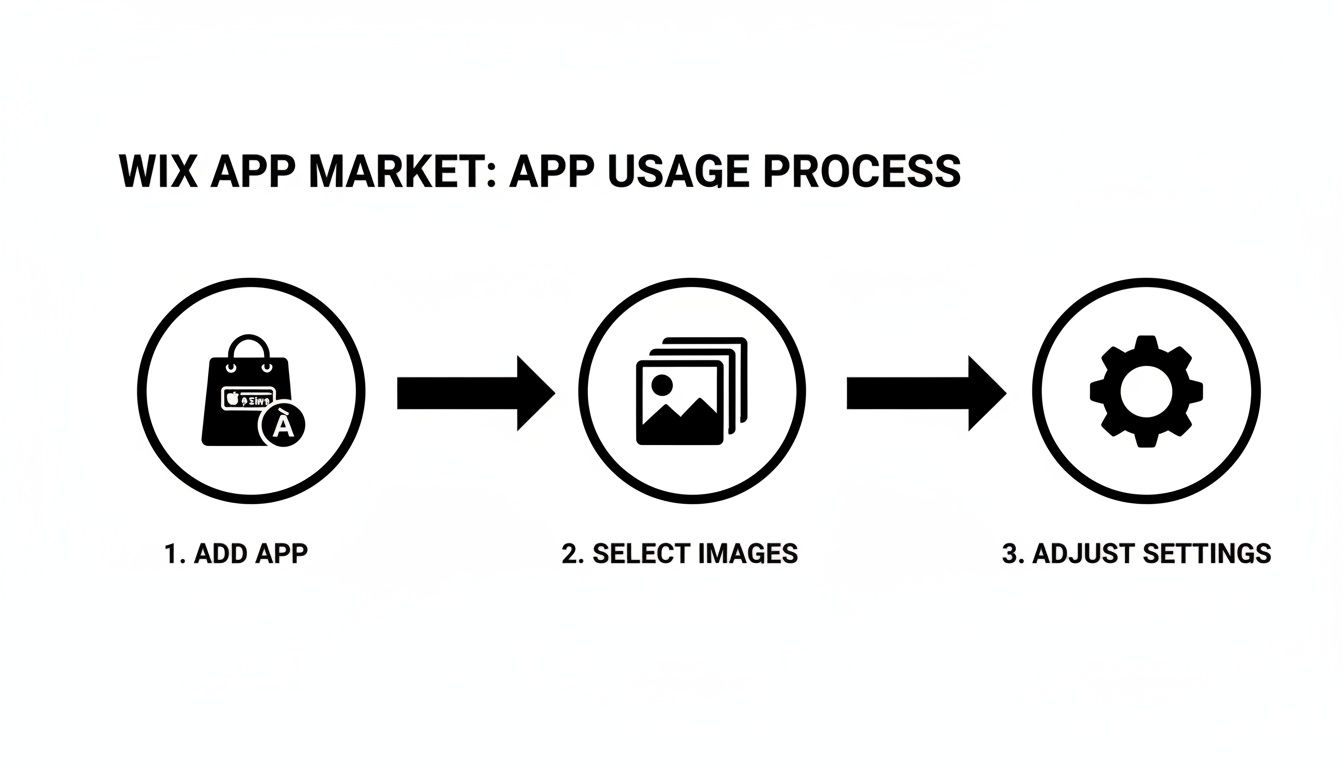
Sure, the app method is a quick three-step affair, but our Velo approach gives you total control by directly manipulating page elements with a bit of code.
By understanding how works, you're not just copying and pasting; you're learning a fundamental Velo concept. This opens the door to other cool effects. What if you wanted a vertical reveal? Just tweak the "top" or "bottom" clip values instead of the "left."
This hands-on approach puts you in the driver's seat. For anyone looking to dive deeper into what’s possible, there are tons of great resources out there for the budding Wix developer to expand their skills.
Optimise Your Slider for Performance and SEO
That flashy before-and-after slider looks incredible, right? But if it takes forever to load or Google can't figure out what it is, it's not doing you any favours. A slow website frustrates visitors and gets you penalised in search rankings.
Let’s get this sorted. Here’s how to make sure your slider is fast, mobile-friendly, and actually helps your SEO.

The biggest performance killer, without a doubt, is massive image files. Pulling a photo straight from your camera and slapping it on your site is a recipe for disaster. We're talking several megabytes each, which is way too heavy for the web.
Slow-loading images are a one-way ticket to a high bounce rate. Think about it: a page load delay of just 1-3 seconds increases the probability of a user leaving by 32%. Ouch.
Compress Your Images Before You Even Think About Uploading
Your first stop isn't the Wix Media Library—it's an image compression tool. Before those 'before' and 'after' shots get anywhere near your site, they need to be shrunk down. This process slashes the file size without making the image look grainy or blurry.
Aim to get each image well under 200KB. It sounds small, but it's totally achievable.
Plenty of free online tools can do this in seconds. You just upload your photos, let the tool work its magic, and download the much smaller versions. Making this a habit is one of the most important things you can do to keep your site zippy. If you want to dive deeper, you can learn more about how to improve your website loading speed with other practical tricks.
Master the Wix Mobile Editor (It's Not Optional)
More than half of your visitors are browsing on their phones. Your slider must work flawlessly on a small screen, and that's where the Wix mobile editor comes in. Once you’ve got the slider looking good on your desktop, you absolutely have to switch to the mobile view to double-check it.
You’ll probably need to make a few tweaks:
Resize the Slider: The whole container might need to be adjusted to fit the narrow screen without looking squashed.
Check Your Text: Any text or buttons you've added nearby need to be readable and easy to tap. No one likes fat-fingering the wrong button.
Test the Slider Handle: This is the big one. Can someone actually grab and drag the handle with their thumb? Test it out to make sure it's a smooth, intuitive experience.
A clunky mobile site isn't just an annoyance anymore; it's a deal-breaker. If your slider is broken or hard to use on a phone, you're shutting the door on a massive chunk of your audience.
Give Your SEO a Boost with Descriptive Alt Text
Don't skip this part—it's such an easy SEO win! Search engines can't "see" your images like we do. They rely on alt text (alternative text) to understand what's in the picture. This is huge for both accessibility and for getting your images to show up in Google Image Search.
In Wix, you can add alt text to any image in its settings panel. You need to write a good description for both the 'before' and 'after' photos.
Bad Alt Text (Before):
Good Alt Text (Before):
Bad Alt Text (After):
Good Alt Text (After):
See the difference? Now Google knows exactly what transformation you're showing off, which adds valuable context to the page and strengthens its overall SEO.
Creative Ways to Use Your Before and After Slider
Home renovations and fitness transformations are the usual suspects, but the power of a before and after slider goes way beyond the obvious. Think of this tool as a visual storyteller, one that can show off your value in pretty much any industry and connect with clients in a way static images just can't.
When you start thinking outside the box, you can showcase subtle but powerful changes that a single photo would completely miss. It’s all about creating that interactive "reveal" that makes your expertise impossible to ignore.
Ideas for Service-Based Businesses
If you're a professional selling your skills, a slider is the ultimate proof of your talent. It takes abstract promises and turns them into solid, tangible results, building trust almost instantly.
Here are a few scenarios to get the ideas flowing:
Graphic Designers: Imagine showing a tired, dated logo on the "before" side, then letting the user slide over to reveal your fresh, modern redesign. It’s an incredibly punchy way to demonstrate your branding skills.
Photographers & Retouchers: Let visitors drag the slider between a raw, unedited photo and the final, professionally polished version. This puts a spotlight on your editing magic and the artistry that goes into your work.
Copywriters & Editors: Slap a screenshot of some clunky, poorly written web copy on one side, and your crisp, compelling version on the other. It’s a brilliant way to prove just how much impact strong writing can have.
Showcasing Product Effectiveness
Got a product that creates a noticeable change? A before and after slider is probably your most persuasive sales tool. One of the most powerful examples of this is in real estate, with tools that offer AI Virtual Staging, where an empty, uninspiring room is instantly transformed into a beautifully furnished space.
By allowing customers to interact with the transformation, you're not just telling them your product works—you're letting them discover it for themselves. This interactive proof can be the final nudge they need to make a purchase.
You could see this working for a skincare brand showing clearer skin over time or even a cleaning product tackling a tough stain.
Visualising Data and Growth
And don't forget, sliders work brilliantly for more than just traditional images. For any business focused on growth and metrics, this tool can bring dry data to life.
Picture a marketing agency using a slider to show off a client's website traffic graph. The "before" side might be a sad, flat line, while the "after" reveals a steep upward curve after a successful campaign kicked in. It visualises ROI in a way that a bunch of numbers on a page never could.
Got Questions About Wix Sliders? We’ve Got Answers.
Even when you follow a guide, it’s normal for a few questions to pop up. Dropping a before-and-after slider onto your site can feel like a big deal, but trust me, most of the common snags are easy to fix once you know the tricks.
Think of this as your personal FAQ for getting your slider looking perfect without any of the headaches.
Will This Fancy Slider Slow Down My Wix Site?
This is easily the number one question I get, and it’s a smart one. The short answer is: only if you feed it massive, unoptimised images. The slider itself is pretty lightweight, but the photos you slot into it are what can really bog things down.
The secret is to compress your images before you even think about uploading them to your Wix Media Library.
Aim for under 200KB per image. This is the sweet spot. You keep the quality high but the file size low, which means faster loading times.
Use free online tools. A quick Google search for an image compressor will give you tons of options that shrink your files in seconds without making them look pixelated or blurry.
Every extra second your site takes to load is a potential customer lost. Optimising your images isn't just a techy chore; it's a critical step to keep your visitors from bouncing.
Can I Do This With Videos Instead of Images?
I wish I could say yes, but unfortunately, no. The methods we've walked through—both the plug-and-play apps from the Wix App Market and our custom Velo code—are built specifically for static images. A before-and-after video slider is a whole different beast that would need some serious custom coding or a specialised, and probably pricey, third-party app.
Honestly, for most businesses, a couple of crisp, high-quality images tell the transformation story much more effectively and are way easier to get up and running on your site.
What Are the SEO Perks?
A before-and-after slider can actually give your SEO a nice little boost in a couple of ways. First, it gets people to interact with your page. When visitors are clicking and dragging that slider, they're spending more time on your site. That longer dwell time sends a big, juicy signal to Google that your content is engaging and valuable.
Second, it’s another chance to get your image SEO right. When you add descriptive alt text to both your "before" and "after" photos, you’re telling search engines exactly what those images are about. This helps them show up in Google Image Search, which can drive a surprising amount of extra traffic your way. It’s a simple move, but it adds another powerful layer to your SEO game.
So, Ready to Show Off Your Work?
You’re now officially armed with everything you need to drop a stunning before and after slider onto your Wix site. Whether you go for a quick and easy app from the market or decide to get your hands dirty with a custom Velo solution, the real win is showing your value in a way that’s impossible to ignore.
Look, the point isn’t just to add a flashy gadget to your site. It’s about creating a persuasive, interactive experience that stops visitors in their tracks and proves you get results.
By following these steps—from squashing those image file sizes to making sure it all looks perfect on a phone—you’re setting yourself up to turn casual browsers into convinced customers. Your website is no longer just telling people what you do; it's showing them the powerful story of transformation. Now go ahead and bring your incredible work to life.
Ready to take your Wix site to the next level but need an expert in your corner? Contact Baslon Digital today and we’ll help you build a compelling before and after slider that converts. Find out more at https://www.baslondigital.com.

Comments